


Here is where I offer the first functional designs and one-off's I come up with along the way of producing a new product. Everything is functional, it just may not be as fully refined of a design as the final product ends up. For you collectors of weird paintball stuff this is a good place to find something different.
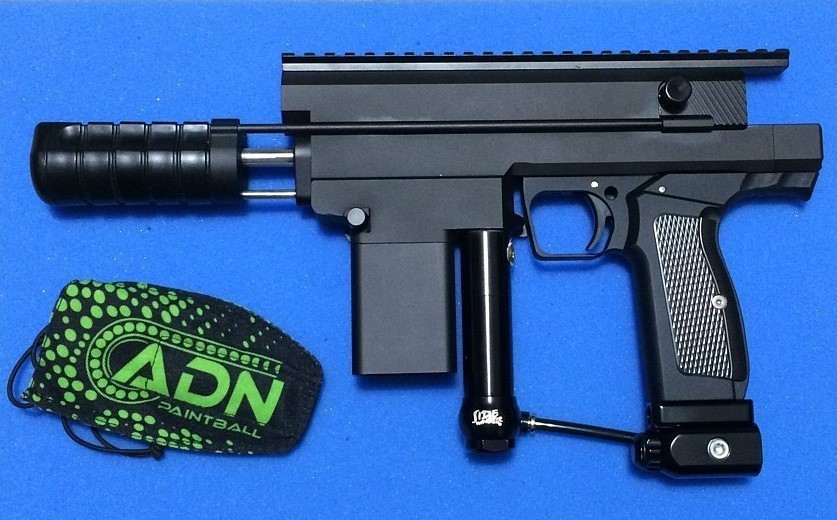
This is the second functional X1P style body made. This is where the beginnings of the idea of having the sled/slide came about. The Sidewinder reg was tapped to install an airline so I could read the input pressure in real time. The bottom of the body was milled down a little bit so it was possible to see the sear and lug nut locations and make sure they were working properly. There was a mistake in the milling of the button area of the front of the body, but it doesn't interfere with function. I used a CCM 86 frame and an Inception ON/OFF ASA. The pump is the short SLICE pump kit. It was from here the decision to move to two removable top rails was made for modularity and aesthetic purposes. The bolt is tapered which allows for feeding FSR, but it doesn't jam when the mag is empty as it was tapered too far. Feeds and shoots great. Uses the Palmer 11/16 Brass valve, the Madmann Green valve/main springs, and a half block style hammer.
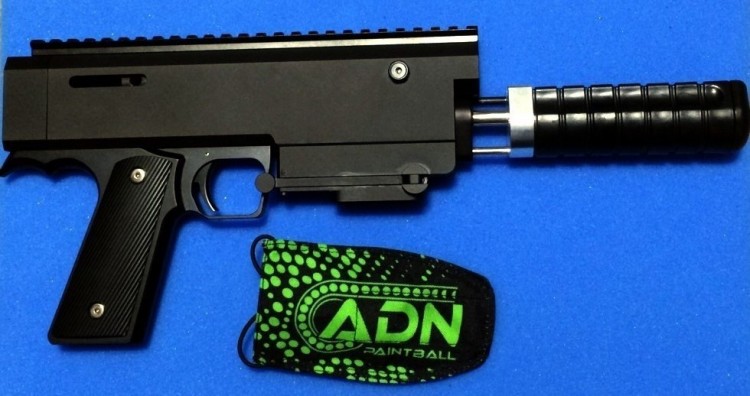
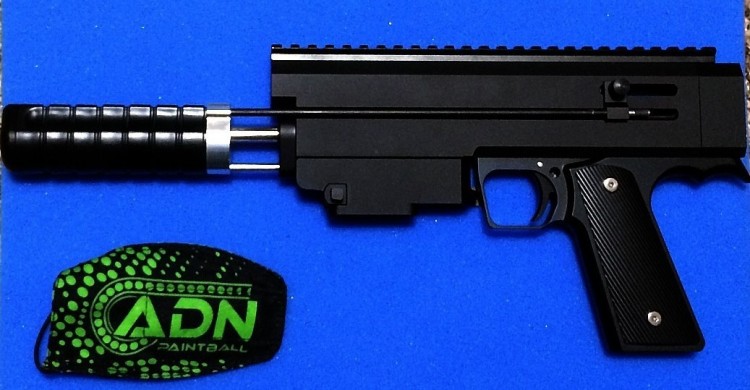
This is the very first functional X1P body made. It started out with the idea of having of the sled being an L shaped bracket that moved along a slot between the top and lower tubes.
The back section holds the IVG and attaches to the body via a screw hidden below the rail on top. The purpose of the back cap was to plug up the top tube from the back while also being functional. The idea was that the IVG could stay wherever it was lasted turned to when you needed to get into the lower tube to clean/lube it. So you'd take the back cap off pull the main spring/hammer out, clean it out and lube it, and then drop it back in and in theory your FPS would stay the same due to the spring tension being the same and the IVG turns being the same. Turned out to be less practical/needed than I had originally thought.
The magwell isn't threaded for the extended magwell piece as it was only by play-testing this gun did I realize I kept trying to hold the magazine instead of the pump handle like you're supposed to when you play pump. I figured if I was doing it, then others would be too and figured I'd make a place for them to grab onto that would be sturdier than the magazine itself.
It was originally drilled and tested with a 2k+ style valve but after testing the second body with the Palmer 11/16" style valve, I discovered it worked better. So I later went back and drilled out the interior tube to 11/16 so now it uses the Palmer brass 11/16 valve.
The gun is functional and needs only a reg, ASA, barrel, and magazines. It shoots FSR great, however the bolt needs a slight taper at the bottom for better feeding. I have not done this to this one as doing so will prevent the gun from jamming when out of ammo. I recommend using a CP reg and a Tempest drum mag with roundball for this one.
X1P P002
2nd Functional Prototype
2nd Functional Prototype
X1P P002
2nd Functional Prototype
2nd Functional Prototype
X1P P001
1st Functional Prototype
1st Functional Prototype
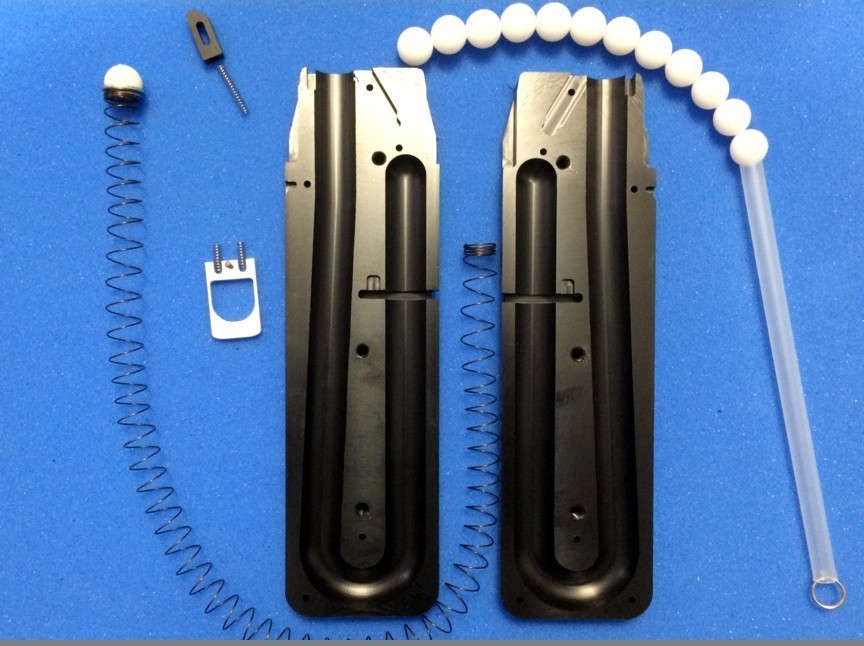
These are the first of the D23 style magazines. I have about 40 of them. I'm happy with them but before I plan to make anymore I figure to see how these 40 go first.
These are a continuous 23-24 roundball (paintballs) only magazine that fit the upcoming SPLYSE markers as well as the DAM.
Cut to shape from solid blocks of HDPE plastic, the D23's are tough. Where most mags have hollow cavities because they are injection molded, these are solid plastic giving them a lot of support strength. The back-draw is the cost of making them is very high as CNC is very expensive per part compared to injection molding. Injection molding tooling is super expensive ($20+k) and that isn't something I want to deal with.
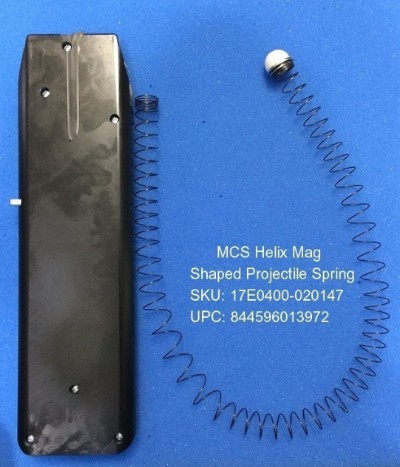
The loading rod and spring are the same as used on the MCS Helix magazine. You will need to get a loading rod if you don't already have one.
(I don't have enough on hand to sell you one right now.)
Follow this link to get one from them:
MCSUS.COM HELIX LOADING ROD
These are a continuous 23-24 roundball (paintballs) only magazine that fit the upcoming SPLYSE markers as well as the DAM.
Cut to shape from solid blocks of HDPE plastic, the D23's are tough. Where most mags have hollow cavities because they are injection molded, these are solid plastic giving them a lot of support strength. The back-draw is the cost of making them is very high as CNC is very expensive per part compared to injection molding. Injection molding tooling is super expensive ($20+k) and that isn't something I want to deal with.
The loading rod and spring are the same as used on the MCS Helix magazine. You will need to get a loading rod if you don't already have one.
(I don't have enough on hand to sell you one right now.)
Follow this link to get one from them:
MCSUS.COM HELIX LOADING ROD
ADN
D23 MAG
D23 MAG
Couple things about the mag:
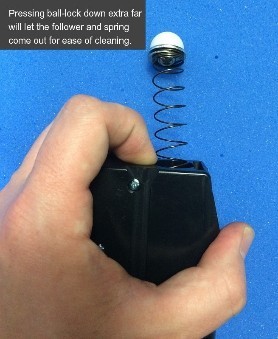
1. Pulling the spring out doesn't require taking the shells apart. Just push down on the ball lock and let the spring/follower come out. Makes for cleaning them out a little easier.
2. Uses a metal activator button. The rounds stay loose until you press on the metal button releasing the spring/follower. You need to push the button either before or after inserting the mag or else the spring can't push the paint.
Sold
Sold